Want to run a massive Black Friday or clearance sale on your Shopify store without the usual headache? A general discount campaign is your best bet for applying a sale to a whole group of products at once.
While you could wrestle with Shopify’s built-in settings, an app makes the process much simpler.
This guide will walk you through exactly how to create Shopify bulk discounts step-by-step, so you can get your promotion live in minutes.
What Is a General Discount Campaign and When Should You Use One?
A general discount campaign (also called a "Price Rule campaign") is your go-to tool for running major sales. It is a blanket discount on many products at once. This saves you the hassle of having to change prices one by one and it becomes very easy to conduct large scale promotions.
This type of campaign is best suited to certain circumstances, including:
- Running storewide promotions on events such as Black Friday. Learn more about BFCM tips to increase Shopify sales in our blog post.
- Removing old or excess stock to make space to receive new stock.
- Launching a new product line with an introductory offer.
Why an App is the Most Effective Method of Creating Shopify Bulk Discounts
When you decide to create a discount in your Shopify store, you can go in several directions. You can adjust the price of each product separately, or you can use Shopify discount codes. These methods may be effective, but they are tedious and complicated when it comes to bigger, store-wide sales.
This is why the best and easiest way is to use a third party app. The Discounty app is one of the easy-to-use and effective options, offering some of the most powerful tools to make the entire process much easier. To show you how it works, the following guide will serve as a tutorial, walking you through every step of setting up your campaign.
If you need more information about the best Shopify apps for Black Friday, we recommend you study our blog post.
How to Create a General Discount Campaign in Discounty: From Start to Finish
Ready to build your first campaign? We’ll break down the entire process inside the Discounty app. It’s easier than you think.
Full Setup Guide, Discounty Demo Series: How to Create a Simple Discount Campaign in Discounty
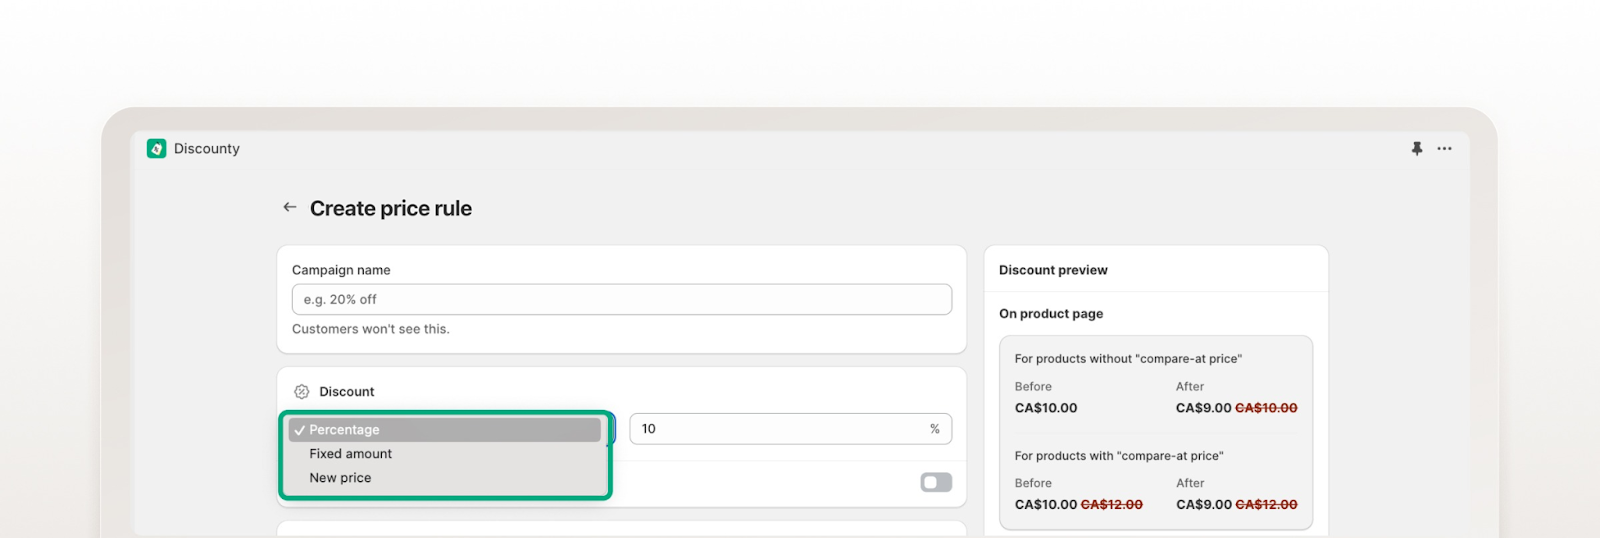
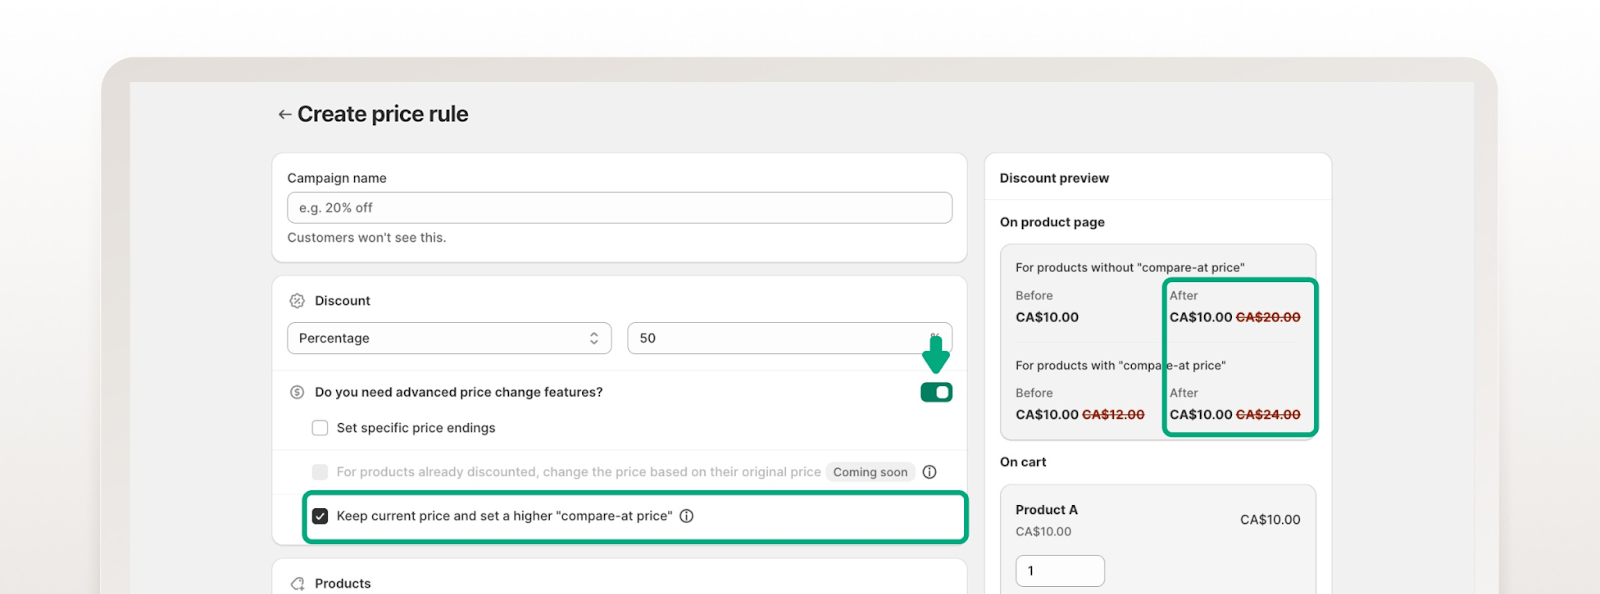
Step 1: Name Your Campaign and Choose a Discount Type
First, give your campaign a unique internal name that you will be able to recognize later, e.g. Spring Sale - 20% Off. This name will not be seen by your customers, but it will help you to track your promotions.
Then select the method of discounting your products. There are three simple choices available to you:
- Percentage discount: Takes a percentage off the price (e.g., 20% off).
- Fixed amount: Subtracts a specific amount from the price (e.g., $10 off).
- New price: Sets a specific final price for all items in the sale (e.g., all items become $25).
Do you know the differences between a percentage discount and a fixed amount discount? Read about percentage vs fixed amount discounts to make better decisions regarding your pricing strategies.
A quick heads-up: "Price Rule" campaigns work by updating your products' live prices and compare-at prices directly in Shopify. If you use other apps that also manage pricing or inventory, be sure to deactivate your Discounty campaigns before making manual price changes to avoid conflicts.
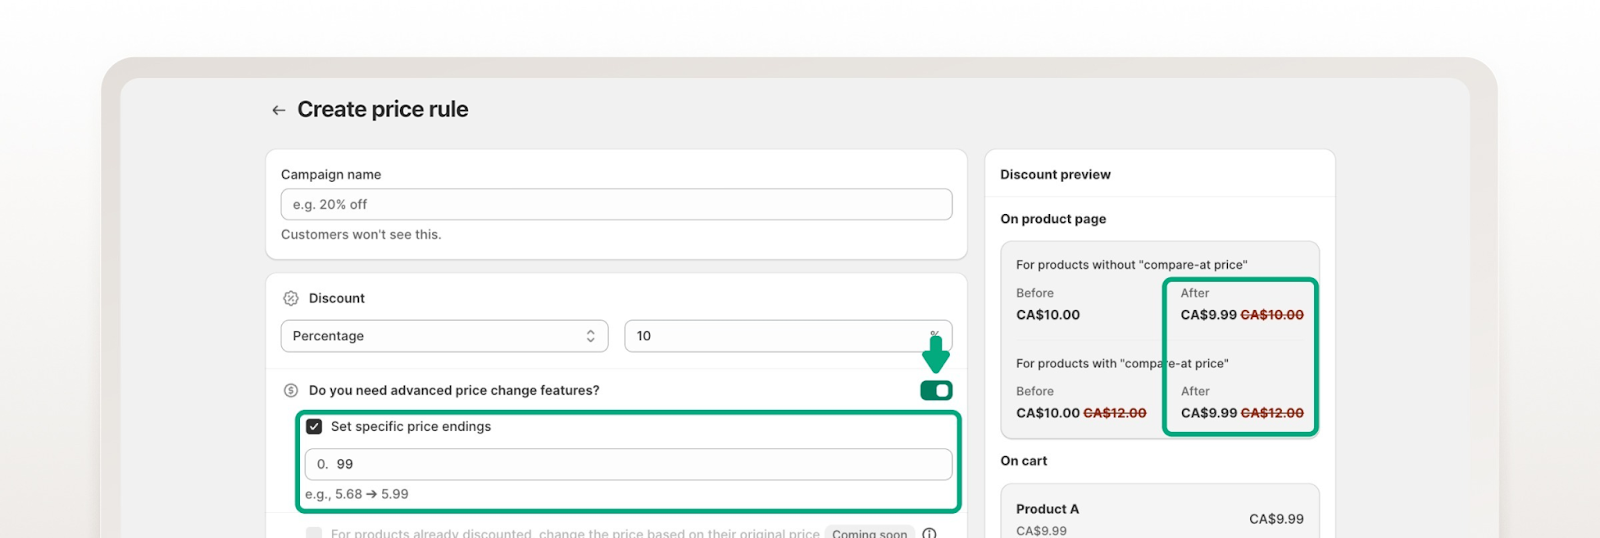
Step 2: Fine-Tune with Advanced Pricing Features (Optional)
This is where you can be creative and have the sale prices as you want them.
- Set specific price endings: This setting will enable you to round your discounted prices to maintain a clean look, e.g. all sale prices end in .99. An example is that a calculated price of 23.87 would automatically change to 23.99.
- Apply discount based on compare-at price: This will apply the new discount to the original price and not the current sale price.
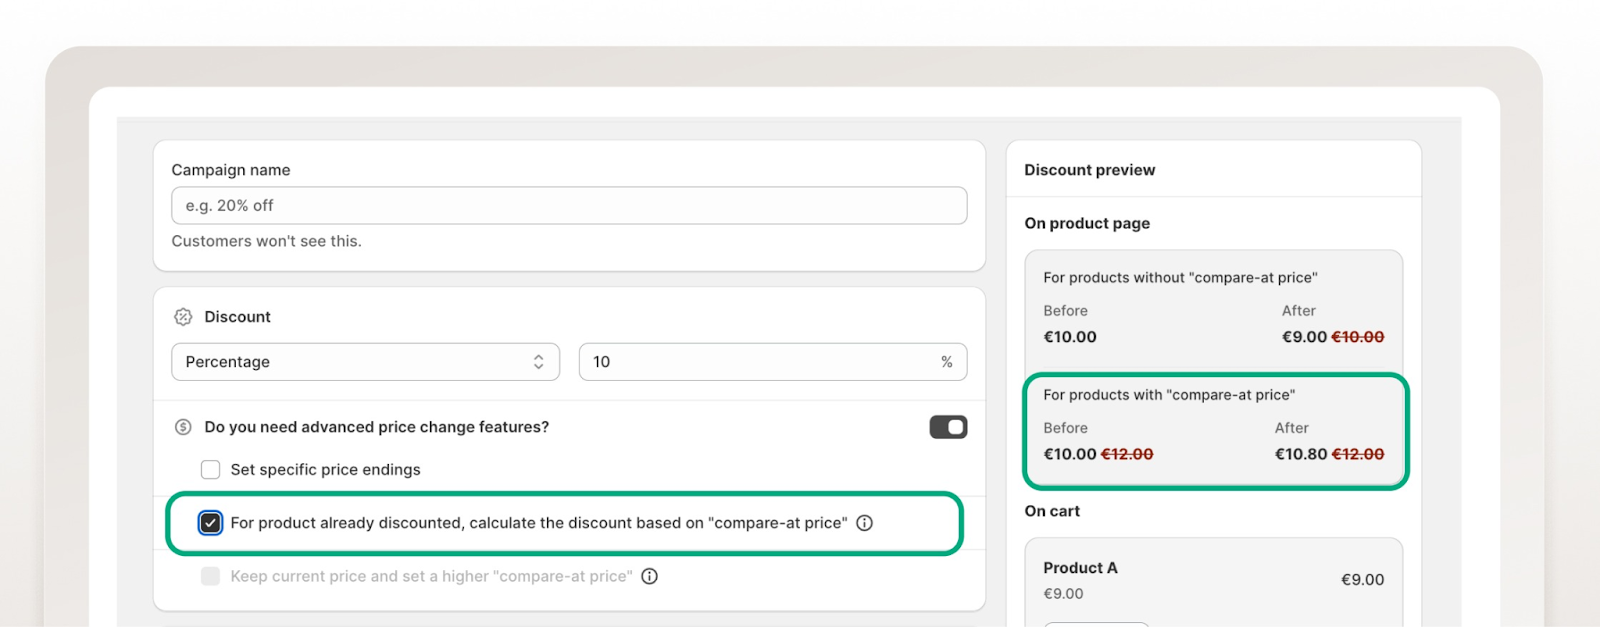
- Keep current price and increase compare-at price: This is a good method of creating a visual discount without actually reducing the selling price. As an example, you might leave the price of a product at 10 dollars but set the compare-at price to 20 dollars, so a 50 percent off sale badge appears on your storefront.
Step 3: Choose Which Products to Include in the Sale
Now, you should tell the app which items are part of this promotion. You can filter to include or exclude products easily:
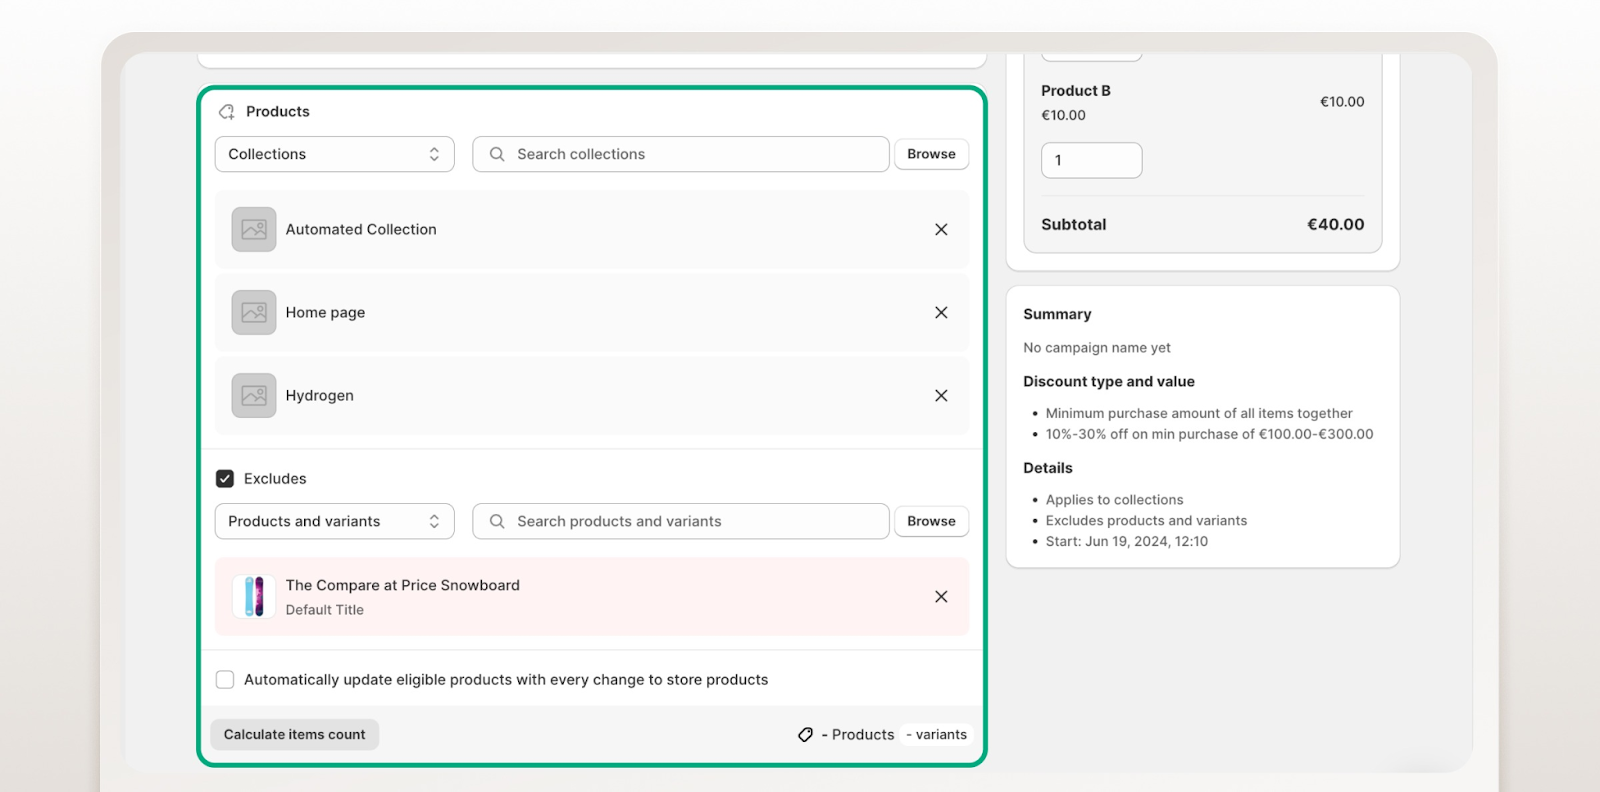
- Include products by Collections, Product tags, Vendors, or Product types. You can also apply the sale to your whole store or you can select items manually.
- Exclude product sections so that specific items are not included in the sale.
Step 4: Automate, Combine, and Schedule Your Campaign
This is where you can set your campaign on autopilot and how it will interact with other sales.
- Enable auto-update (optional): Tick the box of Auto-update to have the campaign automatically add new products that fit your filters. If you add a new t-shirt to your "Summer Sale" collection, it will automatically get the discount.
- Use campaign combinations (optional): This option enables your Price Rule campaign to run in conjunction with, or stack with, other active Discounty campaigns. As an example, you can make it combine with the "Quantity or Value" campaigns. When this box is left unchecked, Discounty will make sure that products in this sale are not discounted by any other campaign, avoiding undesired overlapping of discounts.
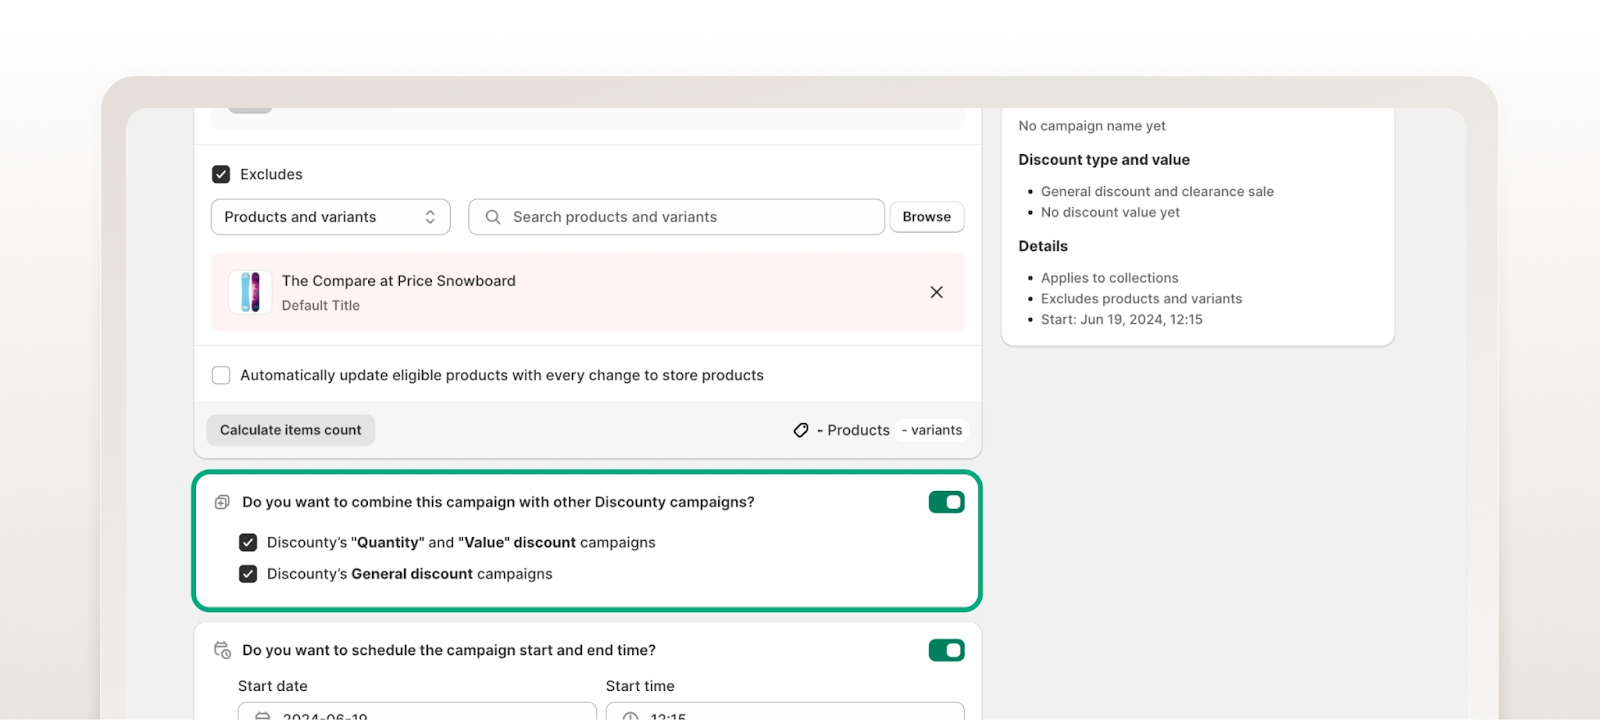
- Set a schedule and countdown timer (optional): You can set the specific time your campaign will begin and end. To make it even more urgent, you can also enable a countdown timer that will be shown on your product pages and will inform customers when the deal will end.
Step 5: Review and Launch
Before you go live, look at the Summary panel. It will give you a short description of the name of your campaign, the kind of discount, the products that will be involved, and the schedule. When all seems to be in order, click Save or Activate to launch your campaign.
Customising How Your Sale Badges Look
Once your discount is active, you want it to look good and catch your customers' attention. This is where sale badges come into play.
First Things First: Your Shopify Theme Controls the Sale Badge
This is a big one to remember: When you run a "Price Rule" campaign, Discounty does the behind-the-scenes work of changing the product's price and setting the original "compare-at price." But the way that discount appears on your storefront, the strikethrough on the old price, the little Sale badge, that is all controlled by your Shopify theme, not the app.
Think of Discounty as the one supplying the pricing data, and your theme as the interior designer deciding how to display it. It is also worth mentioning that these visual changes are only applicable to Price Rule campaigns; other types of discounts, such as quantity-based offers, are not subject to these theme-based sale visuals and are applied at checkout.
A Step-by-Step Guide to Changing Your Badge's Wording and Style
You can usually change that generic Sale badge.
- Changing the Badge Wording (e.g., "Sale" to "Discount"):
- In your Shopify Admin, click Online Store > Themes.
- Click on your current theme, then the “•••” menu and select “Edit default theme content.”
- Look up the word Sale, which will probably be in a tab called Product with a label like on Sale.
- Edit the text to whatever you want and click Save.
- Adjusting Badge Style (Colors and Shapes):
- Go to Online Store > Themes and click “Customize” on your active theme.
- Look for “Theme settings” in the left panel.
- Find a section called “Badges” or “Product labels.” From there, you can adjust colors, fonts, and shapes. Not all themes support this, so you may need to contact your theme developer.
Boosting Urgency with the Countdown Timer Widget
Nothing gets people to click "buy" quite like a ticking clock. The countdown clock is an excellent feature of time-sensitive offers.
To make it work, you must first specify a start and/or end date of your campaign in the campaign setup screen. Then you can turn on the timer widget. Inside the Discounty app, just head to the Customisation> Countdown timer menu, toggle the widget on, and you can change the title (e.g., “Sale ends in!”) and style to match your brand.
A Guide to Campaign Statuses in Discounty
Once you have saved your campaign, you will notice a status beside the name of the campaign. This is not just dummy text, but your mission control, which informs you of what is going on with your sale at any given moment.
Why You Should Pay Attention to Campaign Statuses
Being aware of your campaign statuses will allow you to monitor the whole process of your promotion, starting with the time you schedule it and finishing with the time it expires. Is it applying discounts? Is it waiting to start? Did it expire? A quick glance at the status answers these questions and helps you manage your store's promotions without any guesswork.
What Each Status Means: From "Queued" to "Active" to "Expired"
The statuses can be roughly categorized into two groups: states in which the app is actively performing some action ("processing"), and stable states in which the app is waiting to be told what to do next ("non-processing"). Knowing these will assist you in knowing when you can edit, delete, or launch a campaign.
Processing Statuses (The app is busy)
When your campaign is in one of these states, Discounty is actively working in the background. You generally can't edit or cancel a campaign while it's processing.
- Queued: Your campaign is in line and waiting for its turn to be processed. This status is usually very brief.
- Retrieving: The app is identifying and fetching all the product data from your store that matches your campaign filters.
- Applying: The discount is actively being applied to your selected products right now.
- Reverting: This is the opposite of applying. Discounty is removing the discounts and restoring your products' original settings.
- Auto-updating: This status indicates that the campaign is performing its scheduled check to update any changes in your store, in case you have enabled the auto-update feature.
Stable Statuses (The campaign is waiting)
When processing is finished, your campaign will enter one of these stable states where you can take action, such as editing or reactivating it.
- Scheduled: You have scheduled the campaign to run at a later date. It will sit snug and will automatically kick off when the time comes.
- Active: It's live! The campaign is live on your store, and the discounts are visible to your customers.
- Expired: The campaign has expired, either because it has reached its expiry date or you have deactivated it. The positive thing is that you can reactivate any expired campaign in case you want to run it again.
- Needs Upgrade: This status means that your campaign has more product variants than your current plan can support. You will have to upgrade your plan to continue.
- Error: This means that there is a problem in processing. A tooltip next to the status will provide more information and you can always contact support to help.
Pro Tips for Your General Discount Campaign in Shopify Stores
You have the basics So here are some tips to help you run your campaigns without any hitch and to avoid the common pitfalls.
Tip #1: Test on a Few Products Before Going Store-Wide
Instead of putting a 50 percent off sale on your entire 5,000-product catalog, test it on a small, specific collection. This lets you quickly check that the discounts are applying correctly without having to wait for the app to process every single item. After you are sure that it is functioning as intended, you can scale it up with confidence.
Tip #2: Break Down Huge Sales into Smaller, Manageable Campaigns
Here’s a crucial fact: you can’t edit an active campaign. To make a change, you have to deactivate it, make your edits, and then reactivate it. For a huge campaign, that deactivation/reactivation process can take time because it updates every product one by one. A better approach for stores with lots of products is to break your sale into smaller campaigns (e.g., one for "T-Shirts" and another for "Hats"). This makes editing way faster and gives you more flexibility.
Tip #3: Hands Off! Don't Manually Edit Prices During an Active Campaign
This is a major one. When a "Price rule" campaign is launched, Discounty stores the original prices of your products so that it can restore them to their original state when the sale is over. When you go in and manually adjust the price of a product when the campaign is running, you risk screwing up that process. You could accidentally overwrite the discount or cause pricing errors when the campaign tries to revert. The best practice is to always let Discounty manage the prices and only make manual changes after the campaign has fully ended.
Tip #4: Let Auto-Update Handle New Products Automatically
Want new products to join your sale without you lifting a finger? Use filters combined with the auto-update feature. For example, set your campaign to apply to your "Summer Sale" collection, then check the box that says "Auto-update the campaign's products...". Now, any time you add a new product to that collection, it will automatically get the discount. Just be aware that it can take a couple of hours for the sync to happen.
Conclusion: You are now ready to launch your best sale ever
Now you have all the steps to create a powerful bulk discount campaign. Although Shopify has its own tools that can be used to manage simple codes, a store-wide sale is much easier to manage with an app that is designed to do so. A tool such as Discounty will save you time and provide you with the control to run smarter promotions.
Wonder how simple it can be? To get a feel of these features yourself, install Discounty in the Shopify App Store and create a free account.